Theme Setup
General notes and suggestions for customizing So Simple Theme.
- Basic Setup for a new Jekyll site
- Setup for an Existing Jekyll site
- Folder Structure
- Customization
- Theme Development
- Questions?
- License
Basic Setup for a new Jekyll site
- Install Bundler
gem install bundlerand then install Jekyll and all dependenciesbundle install. - Fork the So Simple Theme repo.
- Clone the repo you just forked and rename it.
- Edit
_config.ymlto personalize your site. - Check out the sample posts in
_poststo see examples for pulling in large feature images, assigning categories and tags, and other YAML data. - Read the documentation below for further customization pointers and documentation.
Pro-tip: Delete the gh-pages branch after cloning and start fresh by branching off master. There is a bunch of garbage in gh-pages used for the theme’s demo site that I’m guessing you don’t want on your site.
Setup for an Existing Jekyll site
- Clone the following folders:
_includes,_layouts,assets, andimages. - Clone the following files and personalize content as need:
about.md,articles.html,index.html,tags.html,feed.xml, andsitemap.xml. - Set the following variables in your
config.ymlfile:
title:            Site Title
description:      Site description for the metas.
logo:             site-logo.png
disqus_shortname: shortname
search:           true
# Your site's domain goes here. When working locally use localhost server leave blank
# PS. If you set this wrong stylesheets and scripts won't load and most links will break.
# PPS. If you leave it blank for local testing home links won't work, they'll be fine for live domains though.
url:              http://localhost:4000

# Owner/author information
owner:
  name:           Your Name
  avatar:         your-photo.jpg
  email:          your@email.com
  # Social networking links used in footer. Update and remove as you like.
  twitter:
  facebook:
  github:
  linkedin:
  instagram:
  tumblr:
  # For Google Authorship https://plus.google.com/authorship
  google_plus:    "http://plus.google.com/123123123123132123"

# Analytics and webmaster tools stuff goes here
google_analytics:
google_verify:
# https://ssl.bing.com/webmaster/configure/verify/ownership Option 2 content= goes here
bing_verify:

# Links to include in top navigation
# For external links add external: true
links:
  - title: About
    url: /about/
  - title: Articles
    url: /articles/
  - title: Google
    url: http://google.com
    external: true

# http://en.wikipedia.org/wiki/List_of_tz_database_time_zones
timezone:    America/New_York
pygments:    true
markdown:    kramdown

# https://github.com/mojombo/jekyll/wiki/Permalinks
permalink:   /:categories/:title/
Folder Structure
so-simple-theme/
├── _includes/
|    ├── browser-upgrade.html  #prompt to upgrade browser on < IE8
|    ├── footer.html  #site footer
|    ├── head.html  #site head
|    ├── navigation.html #site navigation and masthead
|    └── scripts.html  #jQuery, plugins, GA, etc.
├── _layouts/
|    ├── page.html  #page layout
|    └── post.html  #post layout
├── _posts/
├── assets/
|    ├── css/  #preprocessed less styles
|    ├── fonts/  #icon webfonts
|    ├── js/
|    |   ├── _main.js  #main JavaScript file, plugin settings, etc
|    |   ├── plugins  #jQuery plugins
|    |   └── vendor/  #jQuery and Modernizr
|    └── less/
├── images  #images for posts and pages
├── _config.yml  #Jekyll site options
├── about.md  #about page
├── articles.html  #lists all posts from latest to oldest
├── index.html  #homepage. lists 10 latest posts
├── tags.html  #lists all posts sorted by tag
└── sitemap.xml  #autogenerated sitemap for search engines
Customization
_config.yml
Most of the variables found here are used in the .html files found in _includes if you need to add or remove anything. A good place to start would be to change the title, tagline, description, and url of your site. Links are absolute and prefixed with {{ site.url }} in the various _includes and _layouts, so remember to properly set url1 and use http://localhost:4000 when developing locally or else the theme’s stylesheet and scripts won’t load.
#### Disqus Comments
Create a Disqus account and change disqus_shortname in _config.yml to the Disqus shortname you just setup. To enable commenting on a post, add the following to its front matter:
comments: trueOwner/Author Information
Change your name, and avatar photo (200x200 pixels or larger), email, and social networking urls. If you want to link to an external image on Gravatar or something similiar you’ll need to edit the path in head.html since it assumes it is located in /images.
Including a link to your Google+ profile has the added benefit of displaying Google Authorship in Google search results if you’ve went ahead and applied for it.
Google Analytics and Webmaster Tools
Your Google Analytics ID goes here along with meta tags for Google Webmaster Tools and Bing Webmaster Tools site verification.
Top Navigation Links
Edit page/post titles and URLs to include in the site’s navigation. For external links add external: true.
# sample top navigation links
links:
  - title: About Page
    url: /about/
  - title: Articles
    url: /articles/
  - title: Other Page
    url: /other-page/
  - title: External Link
    url: http://mademistakes.com
    external: true
Simple Search
Adding the following to _config.yml enables search using Christian Fei’s Simple Jekyll jQuery plugin. Clicking search will trigger a fullscreen overlay that searches post titles’ using an autogenerated JSON file.
search: true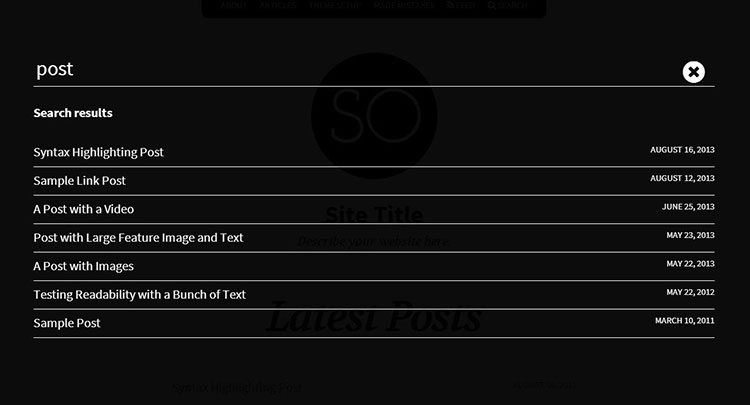
Other Stuff
The rest is just your average Jekyll config settings. Nothing too crazy here…
_includes
For the most part you can leave these as is since the author/owner details are pulled from _config.yml. That said you’ll probably want to customize the copyright stuff in footer.html to your liking.
Adding Posts and Pages
There are two main content layouts: post.html (for posts) and page.html (for pages). Both have support for large feature images that span the full-width of the screen, and both are meant for text heavy blog posts (or articles).
There are two rake tasks that can be used to create a new post or page with all YAML Front Matter. Using either rake new_post or rake new_page will prompt you for a title and tags to classify them. Example below:
rake new_post

Enter a title for your post: My Awesome Post
Enter tags to classify your post (comma separated): web development, code
Creating new post: _posts/2014-02-10-my-awesome-post.md
There are a few configuration variables that can be changed in Rakefile.rb. By default posts and pages will be created in MarkDown using the .md extension.
Feature Images
A good rule of thumb is to keep feature images nice and wide so you don’t push the body text too far down. An image cropped around around 1024 x 256 pixels will keep file size down with an acceptable resolution for most devices. If you want to serve these images responsively I’d suggest looking at Picturefill or Adaptive Images.
The two layouts make the assumption that the feature images live in the images folder. To add a feature image to a post or page just include the filename in the front matter like so.
image:
  feature: feature-image-filename.jpg
  thumb: thumbnail-image.jpg #keep it square 200x200 px is good
If you want to apply attribution to a feature image use the following YAML front matter on posts or pages. Image credits appear directly below the feature image with a link back to the original source.
image:
  feature: feature-image-filename.jpg
  credit: Michael Rose #name of the person or site you want to credit
  creditlink: http://mademistakes.com #url to their site or licensing
Categories
In the sample _posts folder you may have noticed category: articles in the front matter. I like keeping all posts grouped in the same folder. If you decide to rename or add categories you will need to modify the permalink in articles.md along with the filename (if renaming).
For example. Say you want to group all your posts under blog/ instead of articles/. In your post add category: blog to the front matter, rename or duplicate articles.html to blog.html and change the permalink in that file to permalink: /blog/.
If done correctly /blog/ should be a page listing all of the site’s posts.
ProTip: To create multiple category pages, listing posts assigned to just that category modify the for post loop found in articles.html to something like {% for post in site.categories.articles %}. Just be careful if you decide to paginate this page, Jekyll won’t limit it to the category and will pull from all of your posts unless you use a plugin or a mess of Liquid if statements.
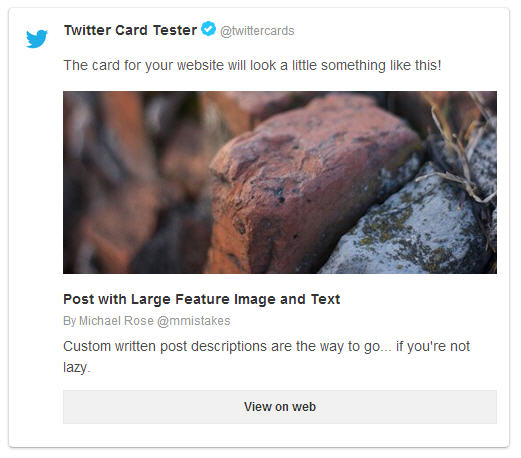
Post/Page Thumbnails for OG and Twitter Cards
Post and page thumbnails work the same way. These are used by Open Graph and Twitter Cards meta tags found in head.html. If you don’t assign a thumbnail the image you assigned to site.owner.avatar in `_config.yml will be used.
Here’s an example of what a tweet to your site could look like if you activate Twitter Cards and include all the metas in your post’s YAML.
Videos
Video embeds are responsive and scale with the width of the main content block with the help of FitVids.
Not sure if this only effects Kramdown or if it’s an issue with Markdown in general. But adding YouTube video embeds causes errors when building your Jekyll site. To fix add a space between the <iframe> tags and remove allowfullscreen. Example below:
<iframe width="560" height="315" src="http://www.youtube.com/embed/PWf4WUoMXwg" frameborder="0"> </iframe>Social Share Links
To enable Facebook, Twitter, and Google+ share links on a post or page, add the following to its front matter:
share: trueTwitter Cards
Twitter cards make it possible to attach images and post summaries to Tweets that link to your content. Summary Card meta tags have been added to head.html to support this, you just need to validate and apply your domain to turn it on.
Link Post Type
So Simple Theme now supports link posts, made famous by John Gruber. To activate just add link: http://url-you-want-linked to the post’s YAML front matter and you’re done. Here’s an example of a link post if you need a visual.
Theme Development
If you want to easily skin the themes’ colors and fonts, take a look at variables.less in assets/less/ and make the necessary changes to the color and font variables. To make development easier I setup a Grunt build script to compile/minify the LESS files into main.min.css and lint/concatenate/minify all scripts into scripts.min.js. Install Node.js, then install Grunt, and then finally install the dependencies for the theme contained in package.json:
npm installFrom the theme’s root, use grunt to rebuild the CSS, concatenate JavaScript files, and optimize .jpg, .png, and .svg files in the images/ folder. You can also use grunt watch in combination with jekyll build --watch to watch for updates to your LESS and JS files that Grunt will then automatically re-build as you write your code which will in turn auto-generate your Jekyll site when developing locally.
And if the command line isn’t your thing (you’re using Jekyll so it probably is), CodeKit for Mac OS X and Prepros for Windows are great alternatives.
Questions?
Having a problem getting something to work or want to know why I setup something in a certain way? Ping me on Twitter @mmistakes or file a GitHub Issue.
License
This theme is free and open source software, distributed under the GNU General Public License version 2 or later. So feel free to to modify this theme to suit your needs.
If you’d like to give me credit somewhere on your blog or tweet a shout out to @mmistakes, that would be pretty sweet.
-
Used to generate absolute urls in
sitemap.xml,feed.xml, and for canonical urls inhead.html. Don’t include a trailing/in your base url ie: http://mademistakes.com. When developing locally I suggest usinghttp://localhost:4000or whatever server you’re using to properly load the theme’s stylesheet, scripts, and image assets. If you leave this variable blank all links will resolve correctly except those pointing home. ↩